 |
| Aluminum Parts |
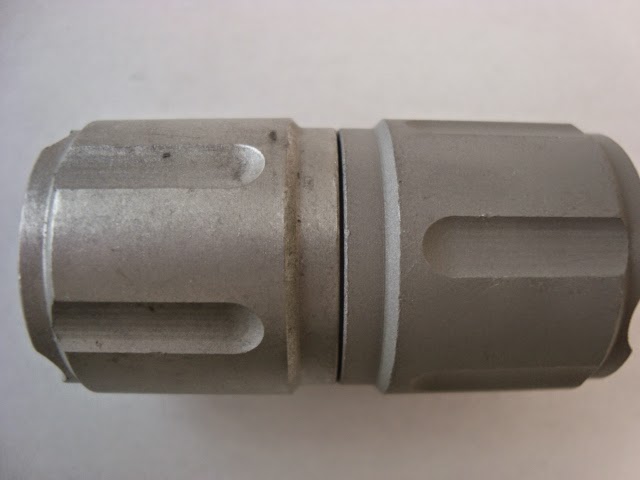 |
| Glass Bead (left) vs Aluminum Oxide Grit (right) |
The Glass Bead blasted part has much more a peened, smooth, uniform finish. The Aluminum Oxide Grit blasted part also has a uniform finish but is more etched and 'darker'.



   The Finished Part Blog
Showing posts with label glass bead. Show all posts
Showing posts with label glass bead. Show all posts
Wednesday, December 17, 2014Glass Bead vs Aluminum Oxide Grit
The Glass Bead blasted part has much more a peened, smooth, uniform finish. The Aluminum Oxide Grit blasted part also has a uniform finish but is more etched and 'darker'. 
Friday, July 5, 2013Concrete Canoes
While it seems a bit counter-intuitive, a concrete canoe can float. Using materials like Glass Beads and Pumice to create a more bouyant material, these student groups have worked with us over the years to great success (and failure).
Out of Concrete and Drudgery Come Canoes That Float - NY Times; June 23, 2013
Thursday, October 11, 2012Glass Bead vs Aluminum Oxide for Deburring Steel Machining and work-hardening steel creates burrs and scale that needs to be removed. The part in the middle of the picture above shows the 'excess' material in threads as well as the darkening caused by scale formation in the heat treating process. While barrel or vibratory tumbling can be used to remove these burrs and create a smooth surface finish, threaded areas often need to maintain the square edges and dimensionality on the part. The other two parts were blasted with different types of abrasive blast media to show how each media can accomplish the deburring task but create a totally different surface finish. The part on the left was blasted with a Medium Glass Bead (70-100 mesh) and resulted in a satin-like surface finish with clean edges. The part on the right was blasted with 120 Mesh Aluminum Oxide Grit and has a more matte, gray surface finish. While Glass Bead can often result in a more aesthetically pleasing finish, the micro-profile achieved with Aluminum Oxide Grit is often required for future processing of the parts (i.e., coatings application).
Wednesday, June 20, 2012Polishing Medical Parts Once cut, machined and heat treated, stainless steel parts to be used for medical applications (see tweezer parts above) need to be deburred and polished to a high shine. The part in the top of the picture above is ready for surface finishing and some light edge rounding. To remove the heat treat discoloration, the part was first blasted with a Coarse Glass Bead. This created a uniform, satin-like surface finish on the part. In this situation, a larger bead was used on the hard metal in order to keep the finish a bright as possible and make polishing a little easier.. After blasting, the part was barrel tumbled with a Steel Polishing Media to smooth out the finish, provide some light edge rounding and prepare the part for an additional polishing step. A final step such as a burnishing wheel or electro-polishing would create a near-mirror finish.
Friday, May 11, 2012Heat Treat Discoloration
Stainless steel parts are often heat treated to anneal (harden) the metal and relieve stress in the parts. While most stainless steels are resistant to oxidation at low temperatures, the various metal in the steel formulation (iron, chromium, molybdenum, etc.) can form oxides at higher temperatures. This oxidation causes the discoloration often seen on steel after heat treatments.
 The knife blade picture above was heat treated to create a harder, more durable product. The part on the left shows the telltale blue, green and black discoloration due to elevated temperatures. Prior to further processing such as polishing and sharpening, the blade needs to be restored to it's original surface finish and coloration. The part on the right was abrasive blasted with a Medium Glass Bead at 80 psi to result in a satin-like, smooth surface finish. This part is now ready for the next step in the process.
Tuesday, March 27, 2012Powder Coat Stripping
Powder coating is used in applications where a tougher finish is required than a traditional liquid paint. The free-flowing, dry powder is typically applied electrostatically and then heat cured to form the bond. Powder coatings are very difficult to remove from the sub-surface as they are often thicker and more aggressively bonded to the surface than more traditional coatings.
Removing powder coating from a surface can be a challenging process. In addition to the thickness of the coating, the bond between the powder and the metal often requires more energy to break than the force needed to etch or potentially damage the sub-surface.  This powder coated punched hole wire mesh was stripped (right side) using an abrasive blasting process with 60 mesh Aluminum Oxide Grit. A larger grit size was also tested (which did strip the coating more quickly) but the metal surface became too heavily etched. Less aggressive media such as Glass Bead and Plastic Abrasive Media were unable to efficiently remove the coating.
Tuesday, November 29, 2011Auto Parts Polishing
Question: I am interested in starting a metal polishing
business mainly for car parts. I am wondering if your wet tumblers would be
best and what type of media would be best for polishing aluminium, rough cast intake manifolds? I have polished some by hand using sand papers, air grinders with various deburring bits and abrasive wheels, polishing wheels and compounds. This is very time consuming, dirty and tiring work. I am looking at an easier way! I am also interested in smoothing and peening other cast or forged metal parts for increased strength and durability!
Response: There are a number of different ways to clean and polish auto parts. Depending on the final finish required and the size, shape and geometry of the part, the final surface finish can range from a smooth, bright finish all the way to a near mirror finish. If parts simply need to be cleaned prior to painting or coating, blasting with Glass Bead will result in a smooth, satin-like or matte surface finish. If additional polishing is needed, vibratory (or barrel) tumbling with a Polishing Precision Ceramic or Stainless Steel Media can produce much smoother, brighter finishes. The key with both processes is to select the proper media shape and size based on the part and areas of the part that need to be finished. The size of tumbling equipment is based on the size and quantity of parts that need to be finished.
Wednesday, September 14, 2011Glass Bead vs Aluminum Oxide for Cleaning Aluminum Parts
Wednesday, September 7, 2011Glass Bead Blasting on Steel
Before
 After Glass Bead Blasting
Wednesday, April 27, 2011Cleaning Welding Discoloration
Welding steel often creates heat discoloration and welding burns. Prior to finishing many parts with processes such as powder coating, painting, clear coats or simple final assembly, the removal of the discoloration and preparation of the surface is necessary.
 Elements were welded onto this steel tube prior to powder coating. In addition to the discoloration (blue streak seen on the left side), this part started to rust in storage. The powder coating process specified that the part be clean and smooth. The right side of the part was blasted with Medium Glass Bead to remove the oxidation, discoloration and provide a smooth, lightly peened surface finish.
Wednesday, March 30, 2011Preventing Static Build-Up
The last post discussed the causes of static build-up during abrasive blasting. Here are some simple procedures and suggestions that can be followed to prevent a 'shocking' experience for the operator.
Wednesday, March 23, 2011Static Build-Up During Blasting
Depending on the type of blast media being used and the procedure, non-hazardous but uncomfortable static discharges can be felt in the blasting operator's arms. This is caused by the flow of the media through the blast nozzle. A static charge is built up and eventually can charge the part being blasted. The friction of the abrasive against the part also builds up a charge.
If the part is lying on the steel work floor, the charge usually transfers to the ground through the metal cabinet. If the part is being held with the blasting gloves, the isolated charge build-up can travel through the gloves and charge the steel arm hole. The build-up can then arc from the arm hole to the operators arm. The amount of static build-up will vary with different media types. Glass Bead tends to produce the most charge. The next post will list a number of tips and suggestions to eliminate the static build-up and prevent shocking the operator.
Wednesday, February 9, 2011Pool Tile Blasting
Even though it seems like snow and ice are never going to go away, now is the time to start thinking about swimming pool maintenance. All pools develop scale deposits especially in hard water areas. Most commonly, the row of ceramic tile at the water level needs to be cleaned.
There are a number ways to remove the scale build-up. Stiff wire brushes require lots of labor and can scratch the tile. Acid chemicals will create an imbalance in the pool chemistry and are a potential health hazard. Abrasive blasting with Glass Bead is an effective, quick and efficient method to remove the scale without damaging the tile or creating a hazardous situation. Details on this article will provide a good start for both homeowners and contractors to start bead blasting pool tile.
Tuesday, November 30, 2010Glass Bead Blasting Machined Aluminum Machining Marks on Aluminum The manufacture of machined aluminum parts creates machining marks or etching on the metal (see the picture above). Abrasive blasting the surface with Glass Bead will produce a uniform surface finish. The Glass Bead is typically blasted at 60-80 psi at a perpendicular (90 degree) angle to the surface. This produces a peened effect for a unique result. Grit type blasting media such as Aluminum Oxide will also remove machine marks but will leave the aluminum or other types of metals with an etched, rough surface finish. The picture shows the same part after blasting with Fine (#13) Glass Bead to produce a very smooth, matte result.  Fine Glass Bead Blasted
Thursday, July 1, 2010Bead Blasting Aluminum Before Machined aluminum parts end up with lines, swirls and etching on the surface of the aluminum. To prevent these surface imperfections from translating through a coating or anodizing, the surface needs to be made uniform. If a polished surface is ultimately required, abrasive blasting the surface with Glass Bead will produce a smooth finish.  After The machine aluminum part (Before picture) was blasted with Fine (#13) Glass Bead to remove the machine lines and produce a highly uniform, matte surface finish (After picture). This parts was ultimately clear coated to produce a clean, bright finish. Different size of Glass Bead will each produce a unique surface finish on aluminum. As the Bead size increases, the surface finish will become more a peened finish and also brighter.
Wednesday, June 9, 2010High Performance Engine PartsRestoring cars, motorcycles and trucks using abrasive blasting is achieved best when the proper media is selected for different areas of the vehicle. Just as it is important to use an aggressive media on a heavily rusted frame or a non-warping media on thin panels, blasting engine parts also demands the proper media selection.
Glass Bead is a very popular media for blasting engine parts. This media will strip paint, oxidation and soils without etching the surface. Glass Bead leaves a smooth, peened surface finish. In some cases (especially high performance engines), the surface tolerances are extremely critical. Blasting with Glass Bead can result in clean parts but potential diminished engine performance.  Before This engine part (above) required the removal of oxidation on the metal. Blasting the part with Glass Bead produced a very clean finish but was too aggressive on the surface finish. The blasted part (below) was blasted cleaned with an Extra Fine Walnut Shell Grit. This much softer media removed nearly all of the oxidation with no impact to the metal surface. This part is now ready for further processing to prepare it for the high performance required.  After
Wednesday, June 2, 2010Tumble Blasting Steel PartsTumble blasting is a process that allows for a batch or load of parts to be abrasive blasted automatically. Tumble blasting is beneficial when a large quantity of 'smaller' parts make it difficult or labor intensive to blast one at a time. This process also removes the inconsistency of manual blasting as each part in every batch will result with the same finish on the entire surface area of the part. The most successful part sizes are generally less than 4 inches and batch weights are generally less than 150 pounds. The tumble blaster specifications and basket size will determine what combination works optimally.  The stainless steel parts pictured above (before on left) are about 3" in size and weigh less than 2 pounds each. The parts were tumble blasted for less than 10 minutes with Coarse (#6) Glass Bead to remove the heat treat discoloration and achieve the finished surface on the right. The geometry of these parts are ideally suited for this process since they will tumble over each in 3 dimensions allowing all areas of the part to be exposed to the blast stream.
Monday, August 17, 2009Shot Peening Specifications
AMS2341/1 - Cast Steel Shot (45-52 HRC) AMS2341/2 - Cast Steel Shot (55-62 HRC) AMS2341/3 - Carbon Steel Cut Wire Shot AMS2341/4 - Stainless Steel Cut Wire Shot AMS2341/5 - Peening Balls AMS2341/6 - Glass Shot (Glass Bead) AMS2341/7 - Ceramic Shot AMS2341/8 - Carbon Steel Cut Wire Shot, High Hardness Each individual sub-spec details technical requirements such as chemical composition, hardness, shape, size among others and the test methods to determine if the shot being used is 'standard'. Using shot peening media that meets these specs ensures consistent and quality results from the media in whatever blasting process is being used.
Tuesday, August 11, 2009Etching Steel Question: I am looking at using media blasting to identify/mark items made from stainless steel sheet using stencils to allow shielding of areas I don't want to blast. The stainless steel (used in a food factory) is highly polished. I was hoping media blasting would give a different enough surface finish to make the marking easily visible but what media would be best to achieve this? Also, would a direct pressure or suction system media blasting cabinet be best? The factory air system produces up to 90 psi and supplied more than enough air to run lots of machinery. Response: You can use either Aluminum Oxide or Glass Bead to create the marking you described. Aluminum Oxide will produce an etched finish with finer grit sizes producing a smoother, lighter etch. Glass Bead will produce a smooth, peened finish with finer grades producing a more uniform, matte finish while coarser grades will leave a brighter finish. Either a suction system or direct pressure blast system could be used. The pressure system will typically shorten the cycle time, produce a more uniform surface finish and allow for more media re-use since you can blast at lower pressures.
Tuesday, July 21, 2009Motorcylce Parts Restoration Question: I'm restoring my '78 Honda. The frame has some small areas of rust that need to be cleaned and repainted. Also, the aluminum engine cases and covers have light corrosion that I'd like to remove and leave a polished effect. What can I use to achieve the highest polish? I have a spot blaster with a 1/4" steel nozzle. Response: The smoothest, most uniform finished can be accomplished with Glass Bead. By blasting perpendicular to the surface a peened, bright finish can be achieved with the larger grades of Glass Bead. The finer grades will produce a more uniform, matte finish that can be polished to a high shine.
Subscribe to:
Posts (Atom)
Subscribe To
 Posts
All Comments
Posts
All Comments
|
|||||||
| |||||||
|
©
Kramer Industries, Inc. All rights reserved. | |||||||
|
| |||||||
























