 |
| Aluminum Parts |
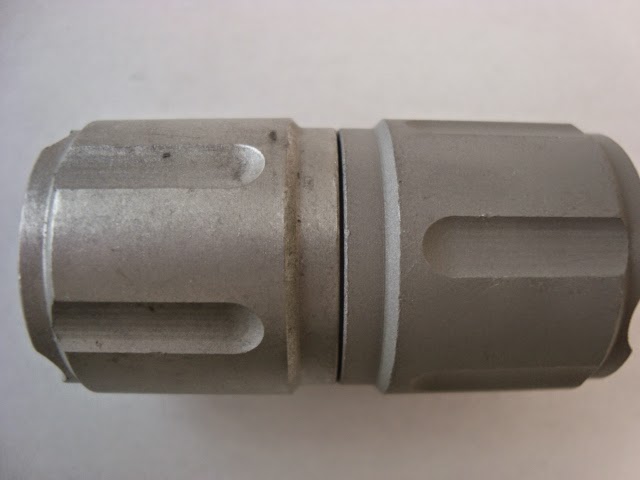 |
| Glass Bead (left) vs Aluminum Oxide Grit (right) |
The Glass Bead blasted part has much more a peened, smooth, uniform finish. The Aluminum Oxide Grit blasted part also has a uniform finish but is more etched and 'darker'.



   The Finished Part Blog
Showing posts with label aluminum parts. Show all posts
Showing posts with label aluminum parts. Show all posts
Wednesday, December 17, 2014Glass Bead vs Aluminum Oxide Grit
The Glass Bead blasted part has much more a peened, smooth, uniform finish. The Aluminum Oxide Grit blasted part also has a uniform finish but is more etched and 'darker'. 
Friday, September 28, 2012Complex Part Geometry There are often many tumbling media options for deburring or polishing parts. Different shapes and sizes of media can be used to round edges, polish into corners and provide a uniform and consistent surface finish. Part shapes and sizes that are relatively 'open' make the media selection much easier. Sometimes parts are so complex that there may be only one option for tumbling media. Finding a media that will be small enough to get into tighter areas of a part but not get stuck in other areas can seem like an impossible task. Selecting a shape that will pass through holes without getting caught in interior areas of the part are a frustrating task. It is amazing how intelligent tumbling media can be and how it seems to always find a way to gang together and cause problems. Simply evaluating a part based on a drawing (or even holding with various media on hand) is not enough. Testing the part with different media options is critically important. The picture above shows a milled slot on the interior diameter of the part. While this type of geometry can be challenging enough, there is a small interior hole at the end of the slot. The media selection to deburr the slot without getting stuck in the hole can be maddening. The pictures below show different features such as exterior threads, small channels and slots of varying widths and depths. While any of these features can be a challenge, all this geometry pictured was located on a single part. For this particular aluminum part, it worked out that an angle cut tristar shape deburred all the critical areas.   
Wednesday, September 5, 2012Plastic vs Ceramic Media Selecting the proper media can be as much an art as a science. A clear understanding of all the finishing requirements is necessary. Considering the needed edge rounding, surface finishing, cycle time, metal type and many other factors are critical. Notice the very heavy flashing on this aluminum part (far left in picture) left over from the machining process. This 'raw' part also had some machining marks on the surface that needed to be removed. The easy solution to finishing this part is to throw it in a vibratory tumbler with some Ceramic Media (see part on right) to remove the flashing and surface marks. Alternatively, Plastic Media will take a little longer to deflash the part but will result in a smoother surface finish and less edge rounding (see middle part). For this project, the objective was to get a smooth surface finish with slightly rounded edges in order prepare the part for a painting process. Ceramic Media was the best selection in this case due to the shorter cycle time, increased edge rounding and 'rougher' surface finish.
Thursday, July 19, 2012Ceramic vs Plastic Tumbling Media The selection of tumbling media for a particular application depends not only on the type of material/metal being tumbled but also on the finish required for the next step(s) in the processing of the part. While less aggressive medias such as Plastic Media or Synthetic Media are typically used with softer metals like aluminum, the results above show a comparison of a Plastic Media versus a more aggressive Ceramic Media. The picture shows the machined part on the far left followed by a part tumbled with a general purpose Plastic Triangle (middle) with a different part tumbled with a Ceramic Triangle on the far right. Both tumbled parts were vibratory tumbled for 1 hour with the same Kramco 1030 mild acid compound. The machined part shows heavy burrs and machining marks on the surface. Both media types removed the machine marks and the burrs on the edges. The differences show up when looking more closely at the 'roughness' of the surface finish and the amount of edge rounding after the 1 hour cycle time. The Plastic Media tumbled part shows slight edge rounding and a matte but uniform surface finish. This is a good finish for anodizing the aluminum part to a matte, smooth finish. The Ceramic Media tumbled part has noticeably more edge rounding and a more tumbled, 'rough-looking' surface finish. This finish is better for accepting paint or powder coating.
Thursday, May 24, 2012Edge Rounding Aluminum Parts
Aluminum is a relatively soft metal and care needs to be taken when tumbling to ensure that the finish is uniform. It is easy to 'over work' some areas of a part if the proper media shape, size and type if used. Often light cutting media such as the Plastic or Synthetic Media is used to build a margin of error and prevent too much edge rounding or a rough surface finish.
 Sometimes, parts need to have a heavily rounded edge. Ceramic Media is much denser and more aggressive media than Plastic or Synthetic and is used on aluminum in these scenarios. The picture above shows the raw, cut aluminum part (left in picture) with the rough edges and the smooth surface finish. After vibratory tumbling with an aggressive Ceramic Media, the edges are rounded and the part has a matte, tumbled surface finish. This result was accomplished in less than 1 hour. These results can be achieved with steel parts but the cycle times are typically longer.
Tuesday, March 13, 2012Polishing Machined Aluminum Taking machined aluminum parts and polishing to a smooth, uniform surface finish is often a multi-step process. Each step is designed to accomplish a different task. The part above has burrs, sharp edges and clear machine marks. Vibratory tumbling is the preferred process.  Step 1 - The edges are softened and the machine marks are removed using a Plastic Cone tumbling media. This media is selected due to it's lower density (vs. Ceramic Media) and lesser aggressiveness. The resulting surface finish is smooth and uniform. This part could be anodized to a matte finish, powder coated or painted with excellent results.  Step 2 - In order to brighten the part and prepare for anodizing to a higher luster, the part was tumbled with Polishing Precision Cearmic Spheres. While the finish is bright and smooth, the proper shape must be chosen to ensure that a uniform surface finish is achieved based on the geometry of the part.
Wednesday, September 28, 2011Precision Aluminum Deburring
The most successful media was a 1/4" ceramic triangle media (see picture below) in a vibratory tumbling process. This media was able to remove the burrs and tabs on the edges as well as leave a uniform, matte finish on the flat surfaces.
Wednesday, February 2, 2011Extruded and Cut Aluminum Tube Extruded and Cut Aluminum Tube The picture above shows an extruded and cut aluminum tube that requires both deburring and removal of the extrusion lines along the sides (inside and out). These 6" long tube sections were vibratory tumbled with a Ceramic Angle Cut Cylinder for 1 hour to produce the clean, rounded edges and surface finish seen in the picture below. A fast cutting (KSF Bond) media was used to minimize the cycle time needed to remove the heavier burrs and extrusion lines. This part is now ready for a variety of secondary steps including coating, anodizing or polishing.  Vibratory Tumbled Aluminum Tube
Tuesday, November 30, 2010Glass Bead Blasting Machined Aluminum Machining Marks on Aluminum The manufacture of machined aluminum parts creates machining marks or etching on the metal (see the picture above). Abrasive blasting the surface with Glass Bead will produce a uniform surface finish. The Glass Bead is typically blasted at 60-80 psi at a perpendicular (90 degree) angle to the surface. This produces a peened effect for a unique result. Grit type blasting media such as Aluminum Oxide will also remove machine marks but will leave the aluminum or other types of metals with an etched, rough surface finish. The picture shows the same part after blasting with Fine (#13) Glass Bead to produce a very smooth, matte result.  Fine Glass Bead Blasted
Friday, September 3, 2010Deburring Aluminum Slots Selection of media shape and size is critical when trying to deburr slots and holes. The material type (i.e., aluminum, steel, plastic) is also important in identifying the proper type of media. The part pictured above (machined on left; tumbled on right) required complete deburring of the part, decent edge rounding and a uniform surface finish. The customer's next step in the process was to create a dull, anodized finish. The part contained a variety of geometric features including approximately 1/4" wide x 1/4" deep slots, both large a small holes, square interior corners and radiused edges. The finished part was vibratory tumbled with general purpose (KX bond) 1/4" x 1/4" Plastic Pyramids. This shape and size of media was selected in order to get into the corners of the slots and result in a uniform surface finish across the part including interior corners. The general purpose media resulted in a dull surface finish ideal for creating a matte, anodized final surface. If a brighter anodized finish was specified, a secondary polishing step in a vibratory tumbler would be improve the results.
Thursday, July 1, 2010Bead Blasting Aluminum Before Machined aluminum parts end up with lines, swirls and etching on the surface of the aluminum. To prevent these surface imperfections from translating through a coating or anodizing, the surface needs to be made uniform. If a polished surface is ultimately required, abrasive blasting the surface with Glass Bead will produce a smooth finish.  After The machine aluminum part (Before picture) was blasted with Fine (#13) Glass Bead to remove the machine lines and produce a highly uniform, matte surface finish (After picture). This parts was ultimately clear coated to produce a clean, bright finish. Different size of Glass Bead will each produce a unique surface finish on aluminum. As the Bead size increases, the surface finish will become more a peened finish and also brighter.
Wednesday, May 26, 2010Removing Machine MarksMachining aluminum parts to create the specified dimensions and geometry of the part leaves light etching, 'swirls' and general machine marks on the surface. Part of the finishing process to achieve the desired finish requires the removal of these marks. While hand grinding and polishing will work, a mass finishing process is certainly a better process  Swirling machine marks The choice of media for a mass finishing process will depend on the required surface finish to prepare the part for the final specified finish. If deburring and heavy machine marks need to be removed, an aggressive media (i.e., Ceramic Media) may be required. If a less aggressive media is needed, a Synthetic Media can be used. Either of these cutting steps can be followed with a polishing media to smooth out the surface finish and remove the 'tumbled' look.  'Tumbled' surface finish
Friday, April 23, 2010Aluminum Edge Rounding Deburring and edge rounding often go together. Aluminum is generally tumbled with less abrasive and lighter Plastic and Synthetic media to minimize wear on the edges. Sometimes a heavy deburr or edge round is specified. The aluminum part in this picture was vibratory tumbled for only 1 hour with a Cylindrical Wedge Ceramic media. I think the finished part on the right speaks for itself especially when placed next to a raw machined part.
Wednesday, February 3, 2010Aluminum Pre-Anodize FinishCreating an appropriate edge and surface finish on extruded and cut aluminum parts that need to be anodized requires both deburring and a smooth surface finish. Anodizing creates a protective oxide layer which can range from a matte to a high polish finish. A major factor in the aesthetics of the final anodized part is based on the pre-anodized surface finish.
 Extruded and cut Extruded and cutThis aluminum part was extruded and cut to size. The part shows an uneven, rough surface finish, sharp edges and burrs. There are also aluminum shavings and scratches that need to be cleaned and removed.  Ceramic Media Tumbled Ceramic Media TumbledVibratory tumbling the aluminum parts with a Ceramic Media will produce a beautifully rounded edge and smooth, matte surface finish. The cycle time will be short (as little as 30 minutes) but the anodized finish will typically be a smooth, matte finish.  Synthetic Media Tumbled Synthetic Media TumbledTumbling the part for a slightly longer time with a less aggressive Synthetic Media will also result in a deburred, slightly rounded edge but a much smoother, more uniform surface finish. A slightly longer cycle time with a 'softer' media will significantly improve the anodized finish resulting in a bright, polished part.
Tuesday, January 26, 2010Quick Polish on Aluminum Aluminum cast parts typically have a dull, matte finish after coming out of the casting process. The part on the right shows this 'raw' surface finish. A quick method to significantly improve the aesthetic finish is to tumble the part with a stainless steel media in a barrel tumbler. The 'finished' part on the left was barrel tumbled for only 15 minutes with a Stainless Steel Round Ball in a wet process with a burnishing compound. This quick polish resulted in a part with a higher quality finish without significantly added processing cost. Note: Use stainless steel media with aluminum or other soft metals to minimize the risk of iron contamination and oxidation/rusting during storage.
Monday, January 4, 2010Finishing Aluminum Parts Deburred DeburredDeburring and polishing aluminum is almost always a multi-step process. The aluminum part pictured above was deburred using an aggressive Ceramic Media in order to achieve a heavily rounded edge. Using an aggressive media, of course, makes the polishing process much more difficult since the surface finish after deburring will be a rough, matte finish.  Polished PolishedAfter tumbling with a Precision Ceramic Media (2nd picture above), the surface finish is much smoother and brighter. While this would certainly not be considered a mirror finish - which is extremely difficult to achieve on aluminum with a tumbling process alone - the part is ready to be painted or anodized to produce a beautiful result. In addition, the part can be further burnished using a dry tumbling process with a media such as Walnut Shell Grit, Corn Cob Grit or even a Hardwood Media and a polishing cream.
Monday, April 27, 2009Polish Engine Parts
Question: I have a smaller tabletop vibratory bowl that I am setting up to do small parts with. Mostly I am looking at doing carburetor parts to polish the aluminum.What material should I use? I am completely new to this. I’m not looking for a 100% show shine, just shiny aluminum. Any input is appreciated.
Response: A 3-step process can produce a very smooth, polished finish on aluminum parts. A first step using a light cutting plastic media followed by a second step using a polishing ceramic media should result in a smooth, uniform finish. Both of these step are run wet with an appropriate tumbling compound.If a higher polish is required, a third dry tumbling step using walnut shell grit with red rouge or a polishing cream will bring out the shine on the part.
Subscribe to:
Posts (Atom)
Subscribe To
 Posts
All Comments
Posts
All Comments
|
|||||||||
| |||||||||
|
©
Kramer Industries, Inc. All rights reserved. | |||||||||
|
| |||||||||
























