 |
| Aluminum Parts |
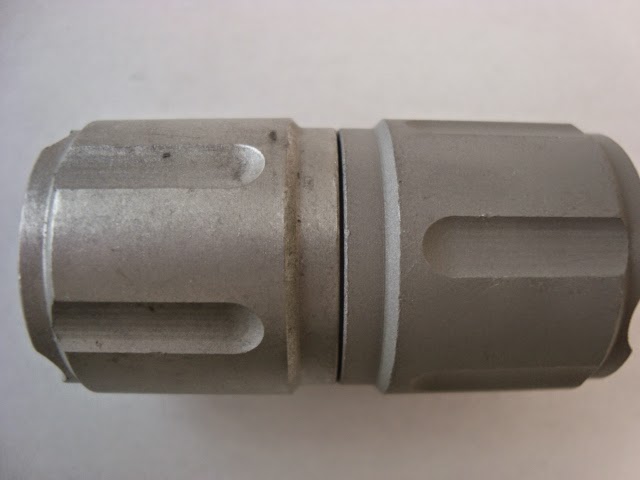 |
| Glass Bead (left) vs Aluminum Oxide Grit (right) |
The Glass Bead blasted part has much more a peened, smooth, uniform finish. The Aluminum Oxide Grit blasted part also has a uniform finish but is more etched and 'darker'.



   The Finished Part Blog
Showing posts with label abrasive blasting. Show all posts
Showing posts with label abrasive blasting. Show all posts
Wednesday, December 17, 2014Glass Bead vs Aluminum Oxide Grit
The Glass Bead blasted part has much more a peened, smooth, uniform finish. The Aluminum Oxide Grit blasted part also has a uniform finish but is more etched and 'darker'. 
Thursday, October 30, 2014Frosting Glass  Frosting clear glass to create a totally different look or put some type of design on the glass is a very simple process. This clear glass was abrasive blasted with a White Aluminum Oxide Grit - 240 Mesh to produce a translucent finish. The use of a resist or pattern with exposed areas will allow for only select areas of the glass to be etched leaving the rest clear. Different grit sizes will produce smoother or rougher finishes and cut to different depths into the glass.
Thursday, May 2, 2013Tumble Blasting Paint Hooks
Continuously painting parts using an automated process often involves hanging the parts from a moving track using paint hooks. These hooks invariably will get a build-up of paint and need to be stripped. Abrasive blasting with the proper media will strip the paint and allow the maximum usage lifetime of the hooks. Using a tumble blaster will allow for automated blasting of many parts in a batch and minimal downtime for the hooks.
The two pictures below show the part both before blasting (painted black) and the hooks after blasting with either 60 Mesh Aluminum Oxide Grit or 12-16 Mesh Melamine Plastic Abrasive Blast Media. A batch of these parts were tumble blasted for only 6 minutes at 60 psi.
Upon a closer analysis, the Melamine actually provided an overall better result as can be more clearly seen in the comparison picture below. The Melamine Plastic part on the left does have a small amount of paint left on the surface but enough exposed metal to allow for the hook to perform properly and even could be used in a electro-coating process, if necessary. The Aluminum Oxide blasted part is also clean but this media tended to etch the metal and will ultimately result in fewer usable cycles and/or failure of the hook. 
Thursday, October 11, 2012Glass Bead vs Aluminum Oxide for Deburring Steel Machining and work-hardening steel creates burrs and scale that needs to be removed. The part in the middle of the picture above shows the 'excess' material in threads as well as the darkening caused by scale formation in the heat treating process. While barrel or vibratory tumbling can be used to remove these burrs and create a smooth surface finish, threaded areas often need to maintain the square edges and dimensionality on the part. The other two parts were blasted with different types of abrasive blast media to show how each media can accomplish the deburring task but create a totally different surface finish. The part on the left was blasted with a Medium Glass Bead (70-100 mesh) and resulted in a satin-like surface finish with clean edges. The part on the right was blasted with 120 Mesh Aluminum Oxide Grit and has a more matte, gray surface finish. While Glass Bead can often result in a more aesthetically pleasing finish, the micro-profile achieved with Aluminum Oxide Grit is often required for future processing of the parts (i.e., coatings application).
Thursday, June 28, 2012Blast Hose Wear
How much lifetime can you expect from your blast hose? There are two factors that are the primary determinants. The first is the durability of the hose. Make sure that you are using a hose designed for blasting. One that is the appropriate thickness (1/4" minimum - 3/8" or 1/2" even better) and preferably reinforced.
The second factor is how the hose is used during blasting. As the abrasive media flows through the hose, it will wear the hose from the inside out. If the hose is kept relatively straight, you can expect even wear and a long lifetime. If the hose is bent or looped, uneven wear will occur and bubbles or blow-outs can occur.
This picture shows a used blast hose from the outside. Notice the reinforcement and layered aspect of this properly designed hose. 
While this hose might appear to be in good condition after use, take a look at the cross section of the interior. This blast hose was bent as it came off the blast pot. Notice the uneven wear around the inside - even wearing through the reinforcing cord. 
Thank you to MasterBlaster for his post on contractortalk.com for sharing these pictures and insights.
Friday, June 8, 2012Silicon Carbide Blasting
Choosing the proper grit size of media to get the desired finish is often a little bit of trial and error. Different medias at different pressures on different metals with different processes will result in different surface finishes.
 These 304 stainless steel washers needed to be etched with Silicon Carbide Grit to achieve a lightly etched finish (Aluminum Oxide Grit was not allowed for this particular situation). Since the exact finish was not specified, a range of grit sizes were tested. Starting at the top and going clockwise, the discs were blasted with 36 Mesh, 60 Mesh, 100 Mesh and 220 Mesh Silicon Carbide Grit at the same blasting pressure. While a little difficult to see the detail, it is clear that as the grit size gets finer, the finish get much smoother. This is typical of all types of blasting media. Larger grit will result in a heavier etch than finer grit. It's just a question of what grit size gives the desired results for a specific application.
Friday, May 11, 2012Heat Treat Discoloration
Stainless steel parts are often heat treated to anneal (harden) the metal and relieve stress in the parts. While most stainless steels are resistant to oxidation at low temperatures, the various metal in the steel formulation (iron, chromium, molybdenum, etc.) can form oxides at higher temperatures. This oxidation causes the discoloration often seen on steel after heat treatments.
 The knife blade picture above was heat treated to create a harder, more durable product. The part on the left shows the telltale blue, green and black discoloration due to elevated temperatures. Prior to further processing such as polishing and sharpening, the blade needs to be restored to it's original surface finish and coloration. The part on the right was abrasive blasted with a Medium Glass Bead at 80 psi to result in a satin-like, smooth surface finish. This part is now ready for the next step in the process.
Tuesday, March 27, 2012Powder Coat Stripping
Powder coating is used in applications where a tougher finish is required than a traditional liquid paint. The free-flowing, dry powder is typically applied electrostatically and then heat cured to form the bond. Powder coatings are very difficult to remove from the sub-surface as they are often thicker and more aggressively bonded to the surface than more traditional coatings.
Removing powder coating from a surface can be a challenging process. In addition to the thickness of the coating, the bond between the powder and the metal often requires more energy to break than the force needed to etch or potentially damage the sub-surface.  This powder coated punched hole wire mesh was stripped (right side) using an abrasive blasting process with 60 mesh Aluminum Oxide Grit. A larger grit size was also tested (which did strip the coating more quickly) but the metal surface became too heavily etched. Less aggressive media such as Glass Bead and Plastic Abrasive Media were unable to efficiently remove the coating.
Wednesday, January 4, 2012Cleaning Paint Plugs When painting large quantities of parts - especially on a production line - it is common to use plugs and masking materials to prevent paint from being coating on unwanted areas. These materials are often made of flexible materials such as silicone, urethane and rubber in order to make it easier to plug the holes or slots or whatever area needs to be protected. Often, these plugs are discarded after a few uses as the coating builds up on the surface. Removing the paint off the plugs allows for a longer lifetime of the plugs and significant cost reductions. Many companies will simply roll the plugs on a hard surface to remove the paint or knock them with hammer or similar. Since the plugs are typically flexible, it is difficult (but not impossible) to use a mass finishing process such as vibratory tumbling to get the uneven forces (i.e., rolling on a surface) necessary to knock the coating off. In addition, vibratory tumbling is often done wet so the plugs would need to be dried prior to re-use. Of course, this type of process eliminates the hand cleaning one part at a time. Abrasive blasting is another process that can be used to strip the paint. On hard rubber plugs and similar, this process works very well especially in a tumble blast system. On more flexible parts, the results vary widely as the media can simply 'bounce' off the surface. The success pictured above was a simple blast cleaning with Walnut Shell Grit to completely strip the paint. The type and thickness of the coating and the flexibility of the part are important factors when trying to determine whether blasting or tumbling will properly remove the coating. Testing of the parts is typically needed to determine the viability of cleaning re-using the plugs.
Thursday, December 29, 2011Blast Nozzle Size
Question: Do you have a chart which shows the minimum pressure
blaster nozzle size required for each of the mesh sizes of blast media?
Response: A reasonable guideline for proper media flow would be to use a nozzle bore size that is 7-10 times the average particle size of the abrasive blasting media you are using. Note: See Mesh and Micron post to get a rough formula to convert from one identification to the other.
Wednesday, December 7, 2011Auto Blasting with Glass Grit Coatingsguy (thank you!) posted a couple of great before and after pictures of an auto restoration blasting project. The van in the picture above was stripped and ready for priming after blasting with Fine Crushed Glass Grit. Per his comments (link below), the van required 5-1/2 bags of media and 4 hours. Here is a link on contractortalk.com. Thanks again for sharing.
Wednesday, September 14, 2011Glass Bead vs Aluminum Oxide for Cleaning Aluminum Parts
Wednesday, September 7, 2011Glass Bead Blasting on Steel
Before
 After Glass Bead Blasting
Wednesday, August 10, 2011CFM vs PSI and BB's
In a previous post, I explained the difference between CFM (cubic feet per minute) and PSI (pounds per square inch) as it relates to abrasive blasting. CFM is a measure of the volume of air that is needed to move the media through the system. PSI is the force that the media is discharged from the system. It is important to understand the differences when balancing the system you are using and the necessary compressor or air supply.
Betterblast (Glen) has done an excellent job of explaining the differences between CFM and PSI in a post on the contractortalk.com message board (post #6 dated 5 August 2011, 9:37 PM). Thank you, Glen, for this practical explanation using BB's.
Friday, July 29, 2011Titanium Medical Screws
Titanium metal is used for medical and dental implants due to its strength, non-corrosive properties and bonding ability with soft tissue and bone. In order to encourage this bonding process and to give the tissue a good surface to adhere to, the metal needs to have an anchor profile. This very similar to preparing a surface for paint or coating. A rougher surface will provide more surface for bonding.
 The titanium bone screws in the picture show a before and after blasting. These screws have a very smooth surface (before on left) after the machining process. Since the size of the screw is very small, it is difficult to blast the screws one at a time. A Tumble Blast system was used to create the lightly etched profile (blasted part on right) on the surface. The tumble blasting batch process allows for a large number of parts to be blasted at one time in a short period. The surface finish shown was accomplished in about 10 minutes using 60 Mesh White Aluminum Oxide. This grade of media (99.5% pure aluminum oxide) was used to prevent contamination of the metal surface and provide a consistent and uniform finish from part to part.
Wednesday, March 30, 2011Preventing Static Build-Up
The last post discussed the causes of static build-up during abrasive blasting. Here are some simple procedures and suggestions that can be followed to prevent a 'shocking' experience for the operator.
Wednesday, March 23, 2011Static Build-Up During Blasting
Depending on the type of blast media being used and the procedure, non-hazardous but uncomfortable static discharges can be felt in the blasting operator's arms. This is caused by the flow of the media through the blast nozzle. A static charge is built up and eventually can charge the part being blasted. The friction of the abrasive against the part also builds up a charge.
If the part is lying on the steel work floor, the charge usually transfers to the ground through the metal cabinet. If the part is being held with the blasting gloves, the isolated charge build-up can travel through the gloves and charge the steel arm hole. The build-up can then arc from the arm hole to the operators arm. The amount of static build-up will vary with different media types. Glass Bead tends to produce the most charge. The next post will list a number of tips and suggestions to eliminate the static build-up and prevent shocking the operator.
Tuesday, March 8, 2011Wood Stripping with Walnut Shell
An interesting string about stripping a wood ceiling with Walnut Shell Grit on contractortalk.com. The before and after pictures in the initial post are terrific examples of what can be accomplished with the right blast media.
 Some highlights from the job:
Thanks to 'Sand Pot' in Seattle for the post.
Wednesday, February 23, 2011Crushed Glass - Gulf Coast Project
PaintSquare News recently posted an article - Uncontained Blast Medium OK'd for Gulf Coast Project - about the use of Crushed Glass Grit to remove a vinyl coating on a concrete surface. The US Army Corps of Engineers approved the use of this medium for abrasive blasting without containment since the Crushed Glass Grit does not contain free silica or toxic chemicals.
The article does a nice job of explaining the project and what issues needed to be considered prior to approval. Safety of the workers and the area surrounding the project were of prime importance. I think the most interesting part of the article is the long discussion in the comments section. Ultimately, there really is no other reasonable option than to blast the surfaces. While concerns are raised regarding issues with potential hazards in the coating and with blasting concrete, the best choice for this project (and others like it) is Crushed Glass Grit.
Wednesday, February 9, 2011Pool Tile Blasting
Even though it seems like snow and ice are never going to go away, now is the time to start thinking about swimming pool maintenance. All pools develop scale deposits especially in hard water areas. Most commonly, the row of ceramic tile at the water level needs to be cleaned.
There are a number ways to remove the scale build-up. Stiff wire brushes require lots of labor and can scratch the tile. Acid chemicals will create an imbalance in the pool chemistry and are a potential health hazard. Abrasive blasting with Glass Bead is an effective, quick and efficient method to remove the scale without damaging the tile or creating a hazardous situation. Details on this article will provide a good start for both homeowners and contractors to start bead blasting pool tile.
Subscribe to:
Posts (Atom)
Subscribe To
 Posts
All Comments
Posts
All Comments
|
|||||||||||
| |||||||||||
|
©
Kramer Industries, Inc. All rights reserved. | |||||||||||
|
| |||||||||||
























