|
Home » The Finished Part Blog
skip to main |
skip to sidebar
A question about deburring, cleaning and polishing brass, copper and aluminum parts. It's worth reading through the entire question as it provides an excellent description of what may small shops are doing and the frustrations they have.
Question: I primarily machine small parts out of 6061
aluminum, a small amount out of C360 brass and a handful out
of C145 copper. I currently use a small vibratory
tumbler to finish my parts. I use a small (about .25" square base)
green plastic triangle to do the deburr and initial cleaning cycle. The problem with this, is it takes two to three days to run to get satisfactory
results. I have tried running dry, but it takes even longer to achieve
the results I want. I usually add a small cup of water to add some
lubrication. But I have to take the tumbler bowl off and rinse it
out and wash off the media every 6-8 hours because I get a thick
black foam that fills the bowl and turns the media into a solid mass that just
moves around the bowl. After this step, I clean out the tumbler and add a
relatively fine red corn cob media to do a polish. But that also takes
two to three days of tumbling to achieve a decent finish. I never add
rouge or other polishing compound because I have no idea what to use. I
just use the pre-treated corn cob media and replace it every 3 or 4
months. I am hoping to add a new machine to my shop and
expect to produce several hundred parts a week that need polishing (I do not
need to polish to a mirror shine, I merely need to deburr after the machining
operations and provide a nice level of shine). Obviously, I would like to find a better way to accomplish this
over what I have been doing. My parts are typically small - 1.2" diameter
x 0.12" thick discs, 0.75" diameter x 0.25" thick slugs, 0.8" x
0.375" x 2" bars. Many of the parts have threaded holes and
small slots (1/16" wide). I spend a lot of time hand cleaning the
corncob out of the slots with a small pick. I have tried to do research
to find a better solution, but it is one of those ask a dozen people, get
2 dozen answers types of questions. Some people tell me I need flow
through on my first step. Some recommend ceramic some plastic and some
steel shot. Corn cob and walnut shell seem to be recommended for
finishing - some say pre-treated and others say to add rouge. I am at a
loss now as to which direction to proceed so I figured it was time to seek more
professional advise. Would you be able to help me
find the best solution to my problem? I do not have a large space to set
up multiple large tumblers, I need a compact solution with at most, two
tumblers.
Response: I will try to address your questions and offer a simple and
reasonable recommendation.
- Plastic Media, Ceramic Media and other types of deburring media like this require a wet process using an appropriate tumbling compound (i.e., soap/lubricant). Assuming the proper shape and size of media is being used, the cycle times on the types of metal you noted (aluminum, brass and copper) should not be more than a
couple of hours. The cycle times could be longer if you have very heavy
burrs or need to get a highly rounded edge. The foam is probably a result of
not using enough water and no compound. This is common with Plastic Media with
no flow-through system for the solution.
- Given the surface finish requirement of a 'nice shine' and parts descriptions, I would recommend using a 3/8" x 3/8" KSV Synthetic Cone Media and a solution of Kramco 1030 Mild Acid Cleaner. This media is a light, deburring media that will result in a smooth, pre-plate finish. The Kramco 1030 will leave the
metals you are using with a bright finish. This media choice may require a
slightly longer cycle time than a more aggressive media (i.e., Ceramic Media)
but the surface finish will be much better. In addition, a flow-system is
recommended for the best results.
- The polishing media you are using - treated corn cob grit - may be treated with a
rouge or something similar. Cycle times with dry tumbling like this are often
long, 24 hours or more, but can produce excellent, near-mirror finishes. Of
course, if the parts have holes or slots that are similar in size to the grit,
it is common for the media to get stuck. Using the recommendation in #2 above
may eliminate the need for a second polishing step (depending on the specific
finish desired).
- An alternative polishing step could be with a polishing Ceramic Media or Precision Ceramic Media instead of the dry process. While this may not result in the
near-mirror finish achievable with a Corn Cob Grit, the finish can be a smooth,
polishing, bright surface. A solution of Kramco 2030 Neutral Burnishing
Compound would be used in this step.
 |
| Aluminum Oxide vs Glass Bead Blasting |
Different blast media will create different finishes on different types of metal. The aluminum part pictured was etched and corroded and need to be cleaned to a uniform surface finish. The section on the left was blasted with 120 Mesh Aluminum Oxide Grit to create a relatively smooth, matte, uniform finish. The section on the right was blasted with Medium Glass Bead to result in a bright, satin-like finish. A simple change of media can result in a dramatic change in finish.
Machined Aluminum
Anodizing is an electrochemical process where a very thin portion of the surface of the metal is converted into a protecting coating such as aluminum oxide in the case of aluminum metal. Since this is quite different from a painted or powder coated surface any 'features' in the surface will be translated to the anodized finish. Anodizing will not fill in the gaps and micro-profile on the surface of the metal. Machining marks (seen above) will be still visible after anodizing.
Pre-anodized, Tumbled Finish
To remove the machine marks and create a smooth surface for anodizing, vibratory tumbling with a Plastic Tumbling Media was used on this part. The features of this part required a media that will leave a smooth finish across the large, flat surface area as well as all the way into the corners. A Plastic Cone proved to be the ideal solution.
Aluminum is a relatively soft metal that is easily nicked, scratched and damaged by handling - both during the part manufacturing process and after. Restoring aluminum to a uniform and smooth surface finish can be accomplished with mass finishing.  The aluminum part on the left clearly shows the scratches and damage due to heavy handling. The part on the right is the result of a simple mass finishing process to create a uniform, matte surface finish. The part (aluminum cylinders) were vibratory tumbled in a wet process with a general purpose (KM) Ceramic Media and cleaning/lubricating compound for 2 hours. Ceramic Media is typically used with harder metals such as steel; however, in this case, there was no need to further polish the part. If a higher polish is required, a lighter cutting Plastic or Synthetic Media can be used in a (potentially) longer cycle time. This step would be followed with a polishing step.
 Aluminum powder products offer many advantages over other metal powders due to aluminum's inherent corrosion resistance, lightweight density, machinability and non-magnetic properties. After pressing (at lower pressures than other metals) and sintering (at lower pressures) the parts needed to be deburred and prepared for surface finishing/coating or anodizing. The parts in the picture were vibratory tumbled with a light cutting Synthetic Media to remove burrs and create a uniform, matte surface finish (2 discs on left). A second step to polish the parts (2 discs on right) also involved vibratory tumbling but with a polishing Ceramic Media. Appropriate neutral pH compounds were used to remove and prevent oxidation of the surface. Cycle times were only 1-2 hours for each step.
 Before and after of machined aluminum part tumbled with Stainless Steel Media. The 'raw' showed machine marks, scratches and burrs on the edges. After vibratory tumbling with steel media, the part came out smooth, bright and ready for anodizing. Improved polishing could be achieved by additional tumbling with Corn Cob Grit or Walnut Shell Grit or hand buffing to create a near mirror finish.
 Polishing aluminum parts to a very high, near mirror finish in a mass finishing process is very challenging. The relative softness of aluminum makes the metal very susceptible to scratching and impact marks from the media and the vibratory or barrel tumbling process itself. Depending on the original surface finish, a two or three step process is recommended. The first step with an abrasive Plastic or Synthetic Media will remove machine marks, scratches, etc. from the part. The second step using a polishing media ( Ceramic or Steel) will create a smooth, uniform finish. An optional third step would involve a long cycle time dry tumbling of the part with Walnut Shell Grit or Corn Cob Grit to burnish to a high polish. Additives such as rouge can be added in this final step to improve the finish. The part pictured was polished in a vibratory tumbler using Steel Media.
Question: I'm interested in ceramic and glass sphere media for tumbling compressed gas cylinders to remove rust and organic contaminants. I want to clean these cylinders for oxygen service. My cylinders range from large (5' tall by 10" diameter) to medium (2' X 7") in steel to small (1' x 4") in aluminum. I'm primarily interested in doing a thorough job cleaning the cylinders without damaging them. Response: The following recommendations would be appropriate: - 5/32" x 5/16" KM Ceramic Angle Cut Cylinders Media - for the cleaning step
- 150 Mesh Aluminum Oxide Grit - to increase abrasiveness of tumbling process
- 5mm K-Polish Precision Ceramic Spheres - as a replacement for large glass beads (more durable and longer lasting)
- Kramco 1060 - Aluminum safe (even in concentrated form) cleaner and degreaser
After molding these decorative aluminum plates are treated with a black carbon/oxide that then needs to be removed to create a striking, shadow effect. 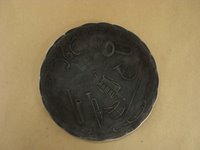 Before tumbling Before tumbling  After tumbling After tumbling While it might seem that an abrasive media with lots of corners (like a triangle or angle cut cylinder) would be best to remove the carbon, this part was vibratory tumbled with Precision Ceramic Spheres and Kramco 1030 to remove the black coating from the high spots. This combination of round media and mild acid cleaner significantly enhanced the 3-dimensional effect desired by the customer.
|







 Posts
Posts






















